Why The Deck Needs Demolition
Okay, let’s talk DIY’er to DIY’er for a minute. Recently a reader asked me why I hadn’t posted anything in my long term projects in a while (please don’t even look in the Lazy House DIY)? What, am I that lazy that I either can’t share progress or I just plain haven’t gotten off my rump to have any updates? Well… I’d say it’s a combination of things (with a lot of excuses). I have a lot of updates that need to happen to the shop and house, but they are dependent on other projects to move forward. Most importantly (and I’m going to let you in on a dirty secret) my workshop does not have proper electricity running to it and that’s a major hold up to expansion. It’s a combination of extension cords and job site surge protectors powering my shop where I have to find the right combination of things to power at the same time so I don’t trip the circuit. For example, I have certain combos that work (and a lot more that don’t):
- Lights + Table Saw + Shop Vac = Okay
- Lights + Table Saw + Shop Vac + Music = Not Okay
- Lights + Router + Fan = Okay
- Lights + Router + Shop Vac = Not Okay
- Lights + Heater + Anything Else = Fear of Fire and Death
The Joys Of DIY Home Improvement
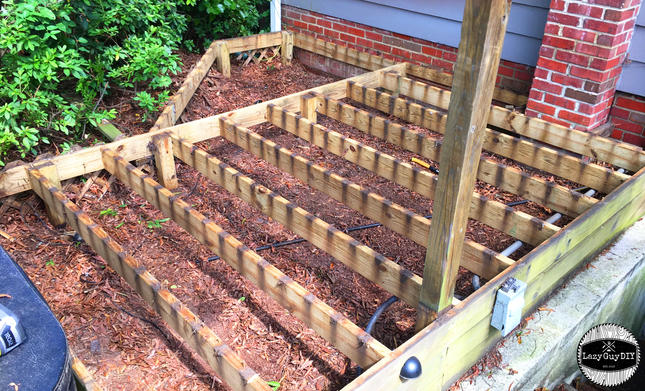
So why not hire an electrician and get them to wire that bad boy up? Well I did have an electrician come out and because we have a back patio/deck that takes up about a 1/3 of our backyard, he said the only way I could run power (without ripping up the deck) would be to come out of the side of our house and dig a trench through the roots of our tree that’s next to our house (strongly suggesting we could damage the health of the tree) and running the buried line out to the shop. It’s not just a little tree either, it’s a massive Willow Oak that our tree guy says is by far the biggest in the neighborhood. The limbs not only cover our entire yard, they extend into the yards of the neighbors on either side of us. So needless to say… jeopardizing the health of the tree was out of the question. So running legitimate power to the shop seemed like a pipe dream… until the day I put my foot through the decking next to our hot tub.
DIY Decking Fail
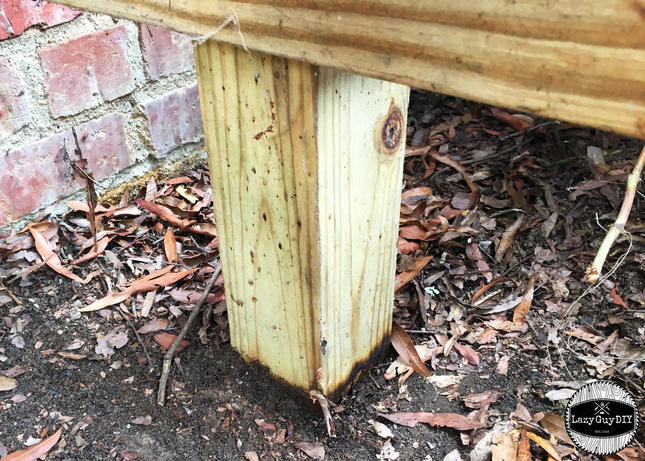
Is it called a deck if it’s not raised? I guess it’s a patio deck maybe? Regardless, running the entire width of the back of the house is a deck… err patio deck… thing. I was a little cautious of the durability of the deck build early on, but DIY’er’s do what DIY’er’s do sometimes . Well I guess that also means a ground level patio/deck thing didn’t get inspected either because the build was great for the short term but would have failed inspection for the long term. If you’re new to outdoor DIY you should know immediately that Pressure Treated lumber is not immune to rot. Especially if wet leaves or debris gather around it, let’s say under a deck that you have no access to underneath and the moisture gathers. While external elements will of course take their toll, there are some things you can control… like the footers (or concrete piers) that go under the support posts of the deck.
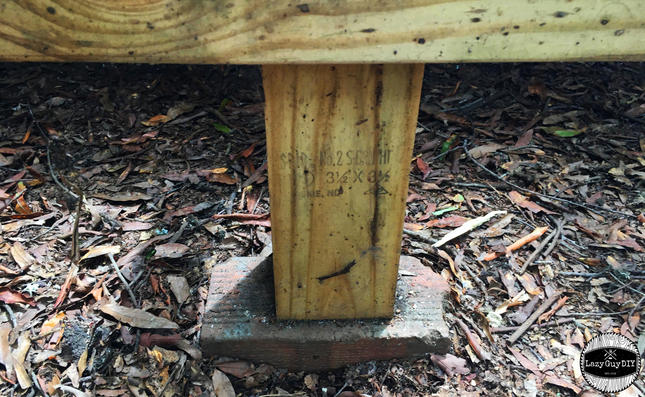
In the case of our deck, there were several DIY methods to reduce the ground contact of the support posts. Most notably, the inclusion of nothing… Good old unprotected ground on post debauchery. For the record, you can inset a concrete block under the footer and that is to code. A few times spare bricks were set into a pattern of 4 with the post in the middle (that then came out from underneath through gravity and weight), other times there was one old brick that was only mildly crumbling. This basically means that the deck was rotting from the ground up. So when I stepped through a decking board, upon further inspection, the entire support underneath had already rotted through and had spread it’s moisture sharing wealth into the next level (currently holding up the hot tub).
The Decision For Demolition
So guess what? The deck has to go. All of it. I can’t trust that the rot is only in the section I started tearing out. It’s all gotta go… which means I now have a clear shot to dig a trench to the shop for electricity! #winning. The plan now is to pull up the remaining deck and replace it with pavers. We’re hoping that this will greatly reduce the number of mosquitoes that are now living under our deck in the layer up layer of decomposing leaves and oh yeah, give us a nicer space to enjoy outside. So aside from complaining about other people’s DIY projects (but I’m sure they had good intentions), how about we talk about what tools I used to demo the deck this past weekend? *Links below are affiliate links.
Tools For Demolition
Impact Driver – I used a combo of my Ryobi P237 and my RIDGID Gen5 Impact Driver. The deck screws (in a mysterious combination of lengths) that were used were embedded deeply with wood that had expanded and contracted over the years so you couldn’t even see the screw heads anymore. You needed some serious power and torque to remove them. It’s a huge workload on these tools because you’re asking for max power from them so you’ll suck through batteries and heat these things up to unsafe levels (especially if it’s in the upper 90’s outside). So make sure you don’t run your equipment into the ground.
Impact Rated Bits – I’ve been trying multiple brands recently and once I popped in the Milwaukee Shockwave bits into my Impact Drivers, I was able to use them for the remainder of this job with barely any wear down. They are hands down the toughest bits I’ve ever used on a project. When I used another brand’s bits prior to my Shock Wave epiphany, I was lucky if I got 2 out of 10 screws from each board. I was easily going 8 for 10 consistently when I changed to the Milwaukee impact rated bits.
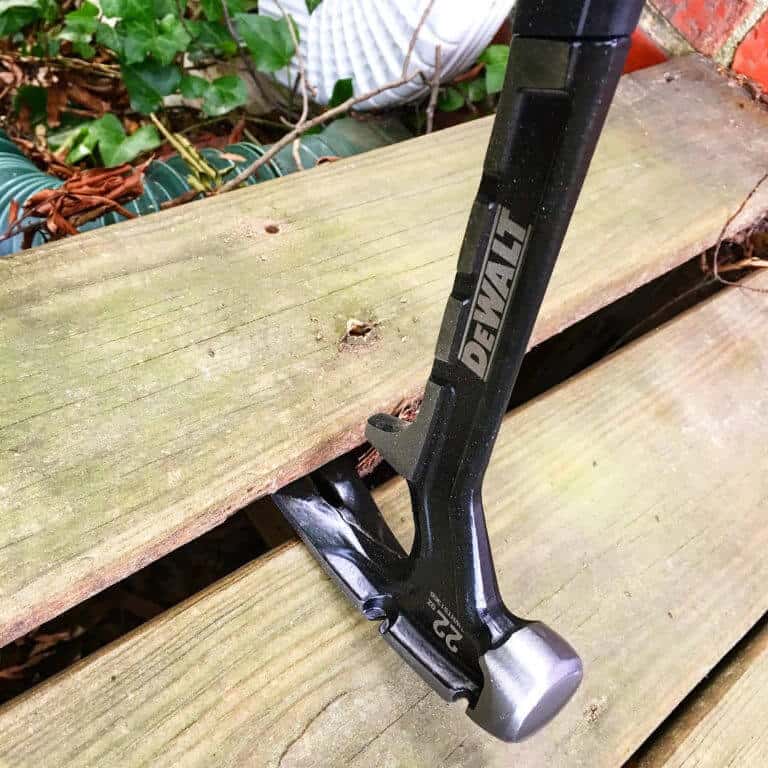
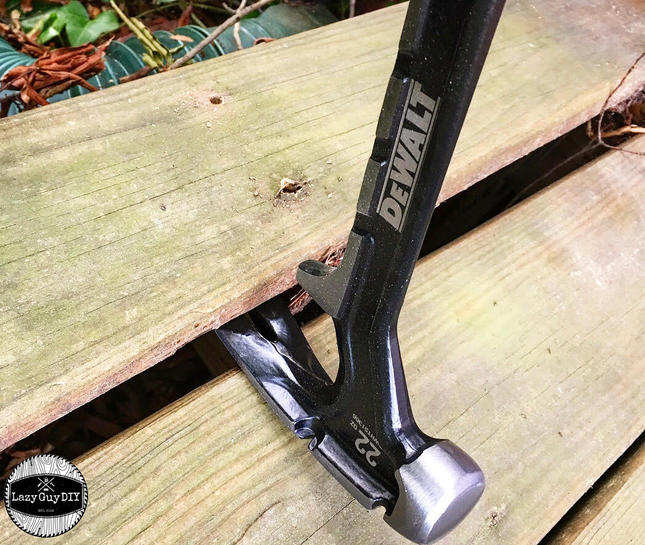
Demo Hammer – DeWALT was nice enough to let me try out their brand new 22” Demolition Hammer (pictured above) and it is absolutely my go to hammer now. Aside from a larger (square) striking surface, it also has a longer claw with a slimmer profile and a sheet good grabbing slot that let me straight up muscle boards through decking screws when the heads were too embedded for the impact driver to back them out. The longer handle also provides a ton of leverage. Who needs to go to the gym when it’s deck demo day? When all else failed I just “Hulk Smashed” pieces until I could get them out.
Reciprocating Saw With Demo Blade – Some areas did require precision cutting or were just stubborn enough that brute force couldn’t whet the appetite for destruction… but a Reciprocating Saw (Like my RIDGID X4) with a Diablo Demo blade cut through any stubborn wood or metal screws like that were nothing. I wanted to salvage a good portion of my material, so I didn’t cut everything in sight, but when I needed to… I had a great option.
Tunes – You’re not going to spend hours in the sun tearing up the deck without a little musical motivation. I mentioned these before, buy my Ryobi SCORE Wireless speaker system is awesome. They run off of the One+ battery platform and pair with any Bluetooth enabled device. You can spread the speakers out 150 feet from the base unit and get basically stereo sound in your yard. I treated my neighbors to everything from Old School Rap to British Indy Rock on my Pandora stations. At least it wasn’t the Lullaby Versions of Classic Rock I used to play my daughter when she was first born. Now that progress is being made you’ll actually get to see progress on the site, so keep an eye out for new “Long Term Project” posts coming soon!
*Update* After the post went live I ended up getting a Makita X2 LXT Reciprocating Saw to finish the demo job. It was life changing. Check out the review!
~ Lazy Guy

