Hey guys we are going to try something new here. I mentioned before I met some awesome folks at the Haven conference, now you finally get a chance to meet one of them. The Fantastic Karrah is from the site Mrs. Do It Herself. She’s a fellow DIY’er/Builder/Maker. Absolutely check out her site at the link above and take a look at some of her tutorials like “How To Paint a Bathtub“, yes I said paint a bathtub…and not with bubbles and weird bath salts.
Karrah asked if I would be interested in taking a look at an inspiration piece and draw up some plans on SketchUp so she could build it. I’m a sucker for design (especially when I don’t have to build it, muwhahaha!), so of course I agreed. What she had in mind was an entry table she saw while on vacation. So what we’re going to do is, I’m going to show you the design plans and Karrah is going to show you the actual build and final product.
On with the build! Oh, and don’t forget to check the link at the bottom to see Karrah’s final reveal. I’m giving you only the steps, she’s showing you the build how the final piece turned out (in real life!).
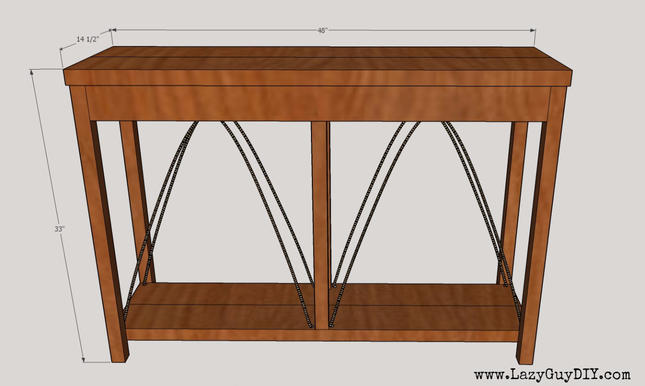
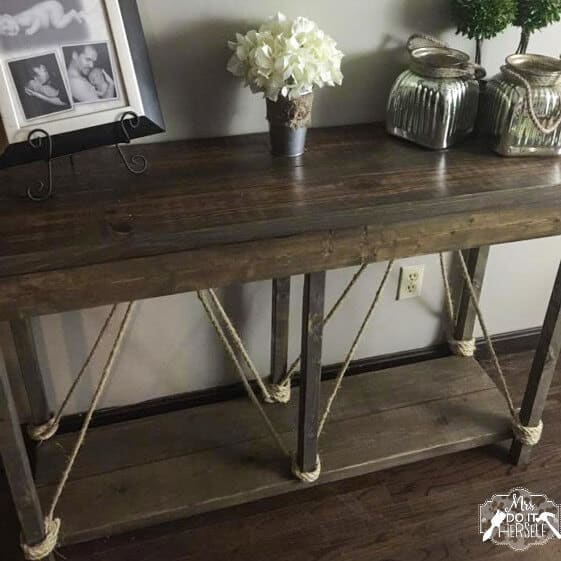
Here’s what we’re going for, an entry table with a thick farmhouse top, farmhouse bottom shelf and optional rope accents. The table measures 33″ tall, 14.5″ deep and 48″ wide. Click here for a downloadable version of the build!
Tools For The Build
- Miter Saw or Circular Saw
- Drill/Impact Driver
- Kreg Pocket Hole Jig
- 2.5″ pocket hole screws
- 1 1/4″ pocket hole screws
- Wood Glue
- Spade Bit (optional with rope)
- Speed Square
- Tape Measure
Material Purchase List
- (1) 2x8x8 try to find one slightly longer than 96″ so you only have to buy one board.
- (1) 2x6x8
- (1) 1x4x10
- (2) 2x2x8 You can dig through normal furing strips (at your own risk) or opt for the premium cuts that are straight.
- Rope (optional) Your choice of thickness and around 25′
- Screw down D-Ring or Screw in Eye Hook wide enough for rope
Step 1
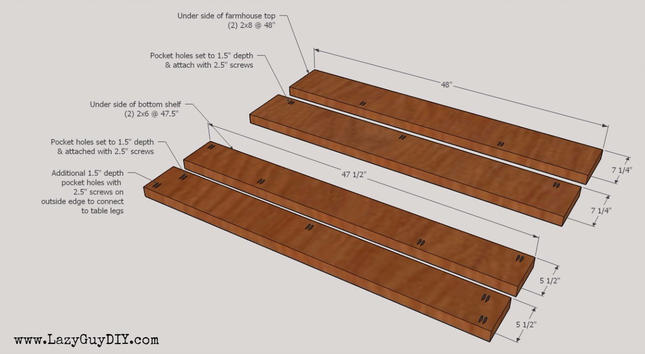
Cut your 2×8 to 48″ lengths. Here’s where that bonus 96″ and change comes into play. If your board is exactly 96″, then your 48″ are more like 47 7/8’s because of the thickness of the saw blade. That’s ok, all is not lost, just make sure the top is centered in later steps. Also, cut your 2×6’s to 47.5″ lengths.
Using your Kreg Jig on both the 2×8’s and 2×6’s, adjust the depth to 1.5″ and cut your pocket holes alternating between both sides. When you’re finished, you can Glue Em’ and Screw Em’ together, but only if they promise to call each other later that week. This is an entry table, not a “one night stand!” (woodworking pun for the win!) Once your 2x’s are attached, add additional pocket holes on the four corners of your 2×6 shelf to attach to your table legs at a later step.
Step 2
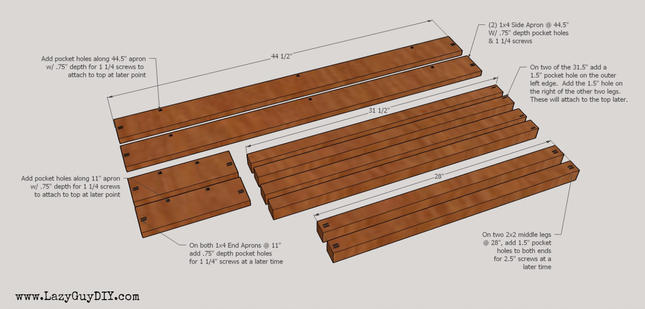
Cut your 1×4’s to length (2) @ 44.5″ and (2) @ 11″. Set your pocket hole depth to .75″ on your jig and your drill bit. If you don’t adjust both, your jig will quietly destroy itself in a fit rage. Seriously. Little blue pieces of plastic carnage everywhere. Add your pocket holes on both ends and the top side of all four pieces of 1×4. The holes along the long edge will attach your legs and base to the table top. Or die trying.
Cut your 2×2’s to length (4) @ 31.5″ and (2) @ 28″. On your 28″ pieces, add pocket holes (re-adjust or face the consequences!) to 1.5″ depth to both ends. On the 31.5″ pieces, put only one pocket hole on the outer edge of only one end. Two legs get a hole on the outer left side, two legs on the outer right side. The reason for this is so we don’t start conflict between the 1×4 pocket holes and the 2×2 pocket holes in a future step. We don’t need another accident like the Kreg Jig conflict of 2013 where the 1 1/4″ screws and the 2.5″ threw down.
Step 3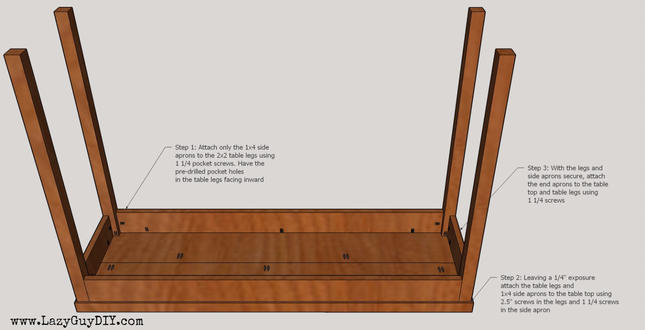
Go ahead and attach the 1×4 aprons to the 2×2 (31.5″) legs using 1 1/4 pocket screws and a little wood glue. Make sure you take note that you’re not covering up the single pocket hole cut into the table leg. You want the outside edges of the table frame to be flush, so your 1×4’s and 2×2 but joints should have a smooth seam… or you can sand them smooth… ha.
Run a little wood glue along the top of your table frame and then place the frame on the inverted 2×8 table top. You should have a 1/4″ edge all the way around. Using 2.5″ screws, attach the table legs with the exposed holes you left out on the 2×2’s.
Now using 1 1/4″ screws, attach the apron portion of the table base to the table top. This is that step that makes or breaks you because if your pre-cut pocket holes are facing away from the table top… you need to disassemble and try again. If all is right with the world, attach the aprons to the table top. Don’t worry, I’ve disassembled many projects.
Step 4
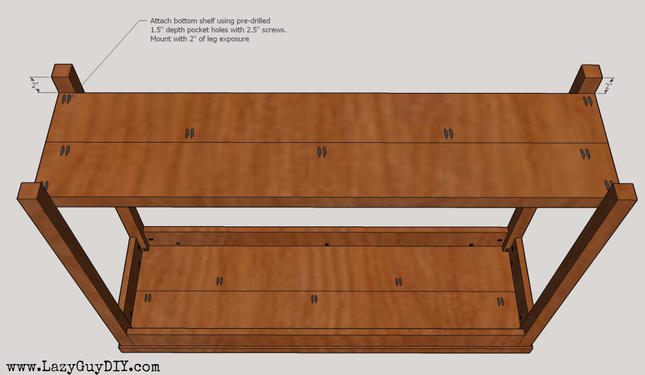
Leaving 2″ of leg exposed (risky standards for the 1700’s! Can you believe Jebediah’s wife showed her ankles at the town meeting? That Harlot!) on the bottom of the table, attach the 2×6 shelf with 2.5″ screws using the pocket holes previously cut for the legs. The shelf should be flush with the outer edges of the legs. You might have some flex in your material and will need to coax it into the right spot. Good clamps and a little muscle makes everything square!
Step 5
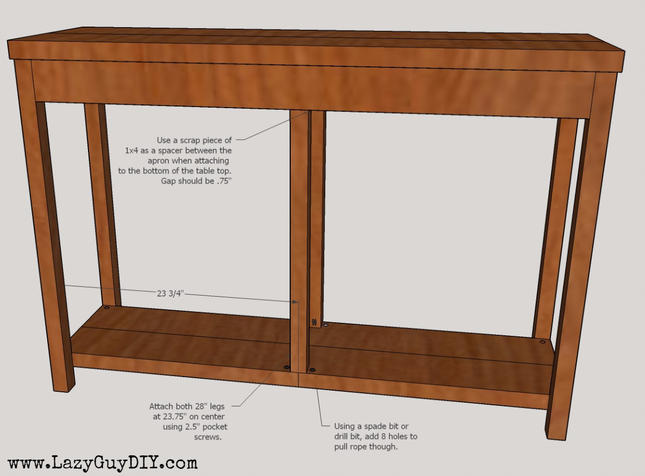
In the middle of the bottom shelf (23.75″ on center), attach the 28″ 2×2 legs using 2.5″ screws. Make sure your holes are facing a direction where you can’t see them or you can easily patch them later.
When attaching the 28″ 2×2’s to the underside of the table top, use a scrap piece of 1×4 to inset the 2×2 from the apron. The leg should be attached .75″ away from the apron.
(Optional) if you want to add the rope and knot the ends under the table, using a spade bit and your drill/driver, cut a hole wide enough for your rope to fit through at the base of each table leg (middle included) on the surface of the 2×6 shelf. You can also just tie the ropes around the legs like Karrah chose to.
This is also a good stopping point to sand and stain/paint your table. All construction is finished, so make sure you really sand the edges and the joints to give a smooth finish. I usually go 120/150 grit and then finish off with a 220. When your stain has set after the recommended drying time, add a coat of poly to seal it up. I never use the Stain and poly combos because I really like a smooth finish. The combo stains give you only one shot and it’s never smooth. Use a normal stain first, let it dry and then after you apply your first coat of poly and it dries, lightly sand the whole surface (by hand not a sander) with 300+ grit sandpaper. Give extra care to areas rough to the touch. It should look dusty when you’re done. Take a damp cloth and wipe the surface clean and then apply a second coat of poly. Repeat the sanding with 300+ grit paper after it dries and then apply a 3rd coat. Each layer you add not only protects your piece, but fills in any voids and makes the surface smoother. I do a 3 coat minimum of poly on all projects.
Step 6 (optional)
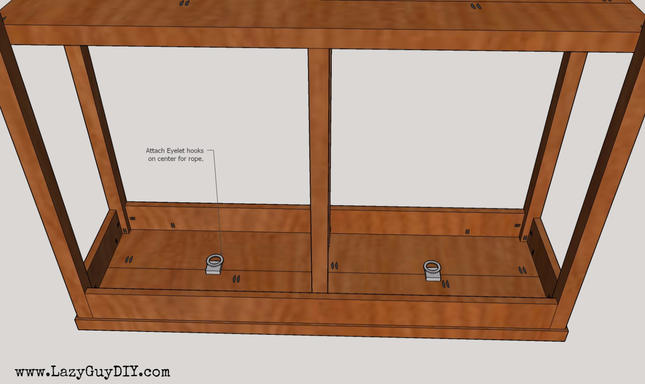
If you are opting to add the decorative rope, attach the D-Ring or screw in Eye hooks to the bottom of the table. Make sure your opening is wide enough to accommodate 2 lengths of rope passing through it. If you opt not to use the rope for decoration, then whatever you do with the rope in your free time is your own secret to keep. I prefer to pretend I’m Indiana Jones when no one is looking.
Step 7 (optional)
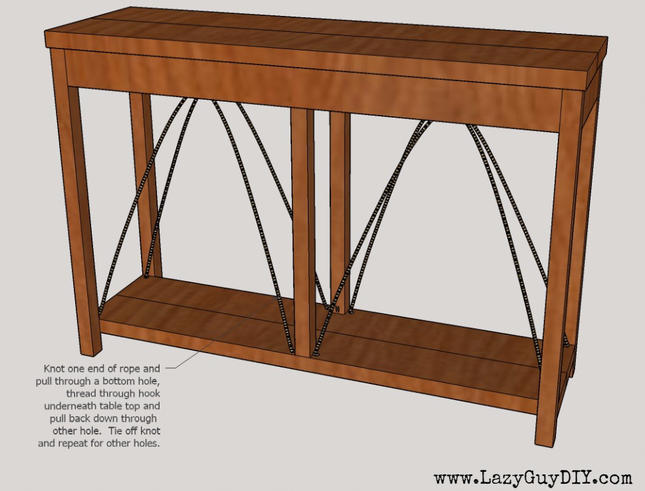 Knot one end of the rope and pull it through the bottom of one of the holes you cut with the spade bit. Feed the rope through the hook under the table and then run the rope back down through the hole diagonal from the hole of origin. Pull it tight, knot it off so it won’t pull back through and repeat on the four holes.
Then you’re done. Seriously. Finished. And I bet it looks awesome. But here’s the moment of truth, now that you’ve looked at these step by step directions, run back over to Karrah’s site at Mrs. Do It Herself and follow along with her on her build, plus take a look at the final reveal! Over here you get the teaser, on her site you get the grand reveal.
If you’re interested in participating in another “I Draw It, You Build It!” post please contact me! ~ Lazy Guy

