We’re back in our school pod for another update to our virtual learning space! We realized that in our classroom setting with five kids on different schedules that things got a little… distracting. So we needed some sort of fun privacy divider to give a little separation. So we teamed up with our friends from DAP Products and used their Weldwood product line to create this Rolling Classroom Divider that comes with a chalkboard, whiteboard and storage!

This project has been sponsored by DAP Products. When you think of DAP’s Weldwood line, that should ring a bell for the adhesive used for those retro wood paneled walls you’ll find in living rooms around country. It’s an adhesive that stood the test of time and the inspiration for the wood paneling used on this Rolling Classroom Divider Build!
Watch The Rolling Classroom Divider Video
Please remember to give this video a thumbs up and leave a comment in the comments section and oh yeah… subscribe to the Lazy Guy DIY YouTube channel while you’re there!
Tools & Materials For The Build
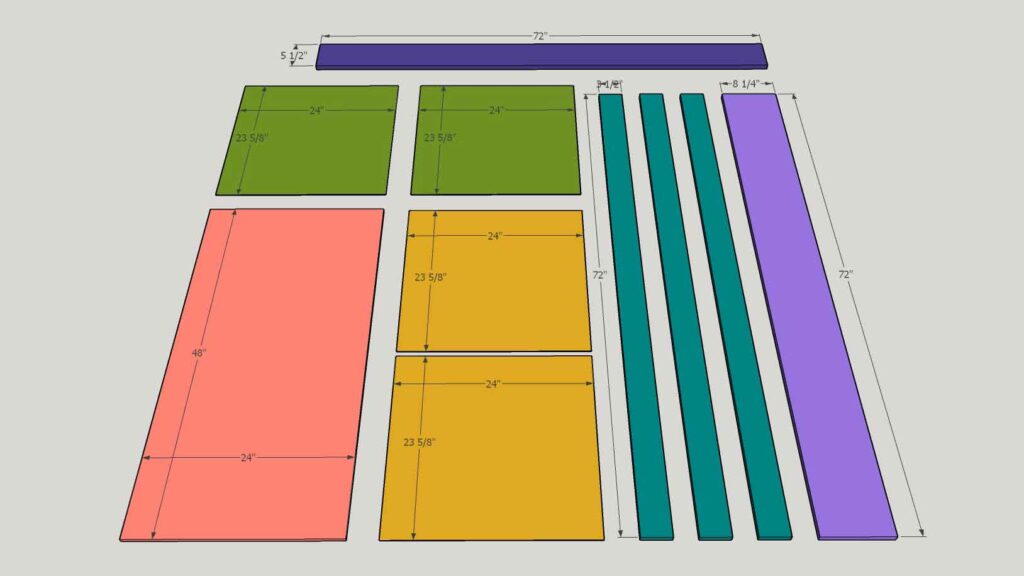
- (1) 24″x48″x1/2″ sheet of plywood
- (1) 24″x48″x1/8″ sheet of underlayment wood paneling
- (1) 24″x48″x1/8″ sheet of whiteboard/blackboard paneling
- (3) 1x4x72″ premium select boards
- (1) 1x10x72″ board
- (1) 1x6x72″ premium select board
- (4) rolling casters
- 1″ self tapping screws (if using pocket holes)
- 3/4″ pan head screws (for casters)
- DAP Weldwood Contact Cement Spray
- DAP Weldwood Contact Cement (spray adhesive alternative)
- DAP Weldwood Wood Glue
- Table Saw (circular saw can be substituted)
- Miter Saw
- Drill/Driver
- Pocket Hole Jig or Doweling Jig
- Brad Nailer (optional)
- Router with Bowl Bit (optional)
- 8″ Dado Stack (optional)
On To The Rolling Classroom Divider Build
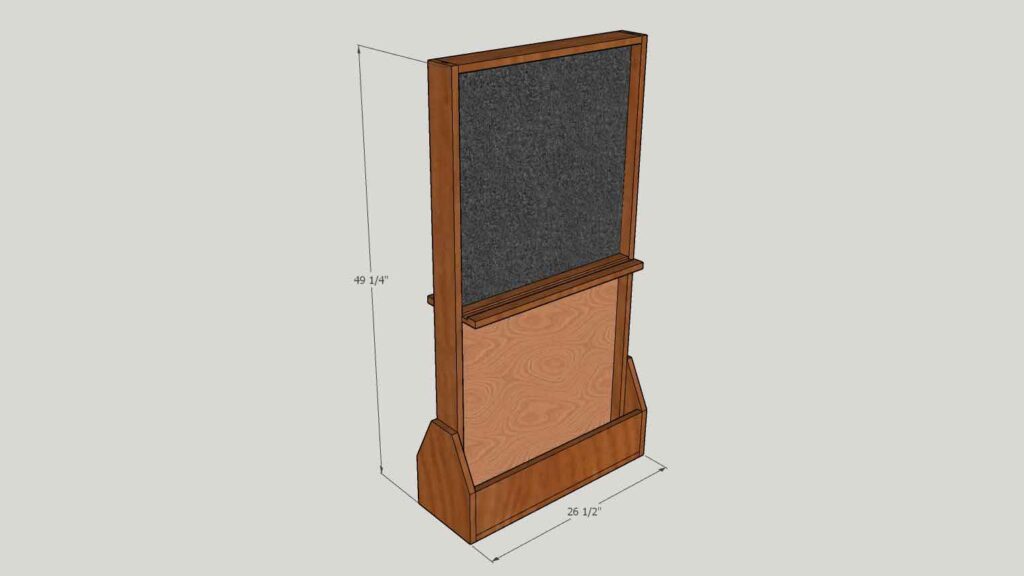
*Quick note about this build. In the video (you better have watched it!), I used a dado stack to cut a groove for the wood paneling to slide into for the frame. You do not have to do this. So I’ll be giving directions below for steps Without A Dado first, which uses pocket holes and then below that With A Dado, like I did in the video. Eventually the steps will merge!
Step 1 – Rolling Divider Base & Frame
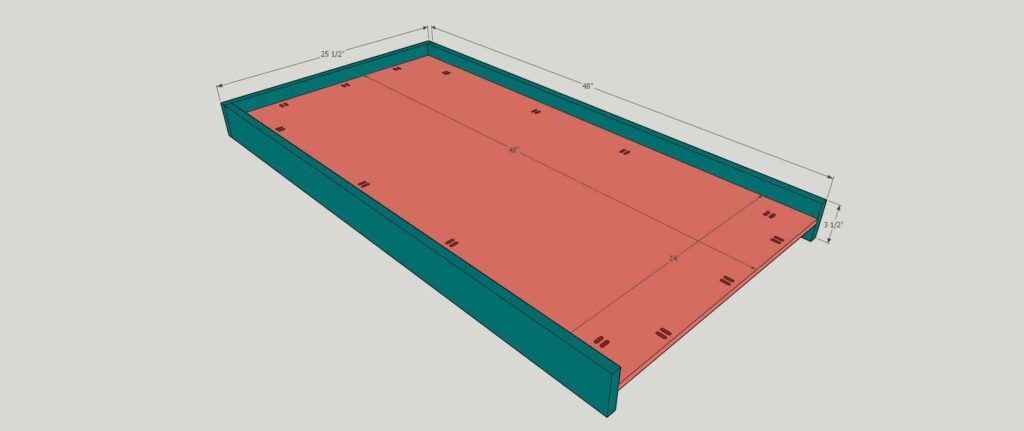
Without A Dado – The entire project is going to be anchored around the 1/2″ sheet of plywood. The 24″x48″ measurements aren’t always standard so you might have to rip it down to those measurements. With a pocket hole jig set to 1/2″ material thickness, pre-drill pocket holes around the outer edge. I would recommend alternating between the front and the back (but it’s pictured all on one side for demonstration purposes). Cut two 1×4’s to 48″ and attach centered on the plywood sheet with wood glue and 1″ self tapping screws. Cut another piece of 1×4 to 25-1/2″ and attach to the top with 1″ self tapping screws.
Step 2 – Rolling Divider Assembly
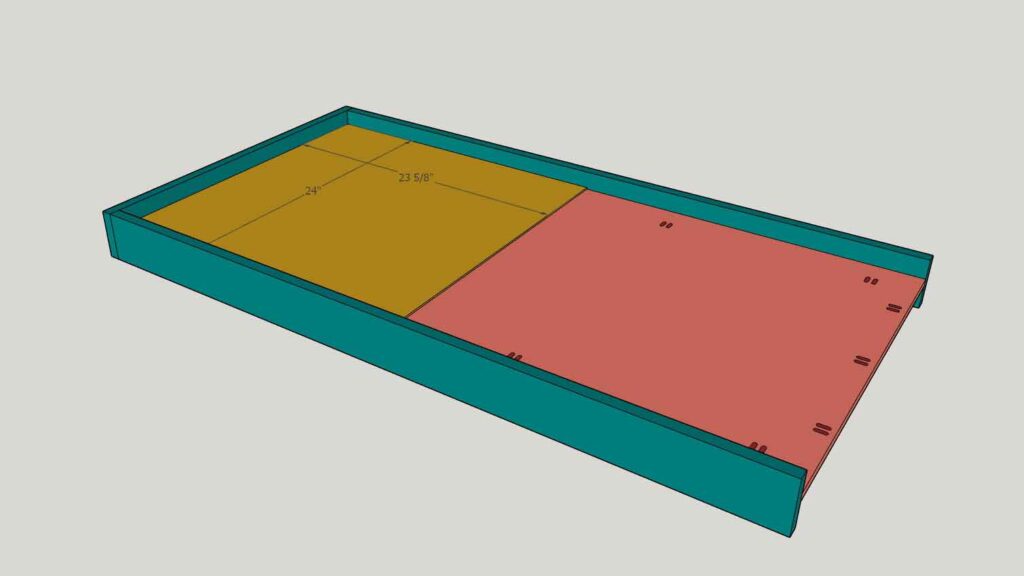
Without A Dado – With your frame attached, rip your piece of whiteboard/blackboard (it’s two sided!) to a pair of 23-5/8″ x 24″ sheets. I know that’s a fraction… don’t freak out. Then apply your DAP Weldwood Contact Cement spray to only the top portion of the plywood sheet. Let it get tacky, then apply the adhesive to the back of your whiteboard/chalkboard sheet and attach your board to the plywood. Repeat this step on the back as well. I alternated and had blackboard on one side and whiteboard on the other. Do not attach the the bottom panels yet.
Step 3 – Shelf Divider
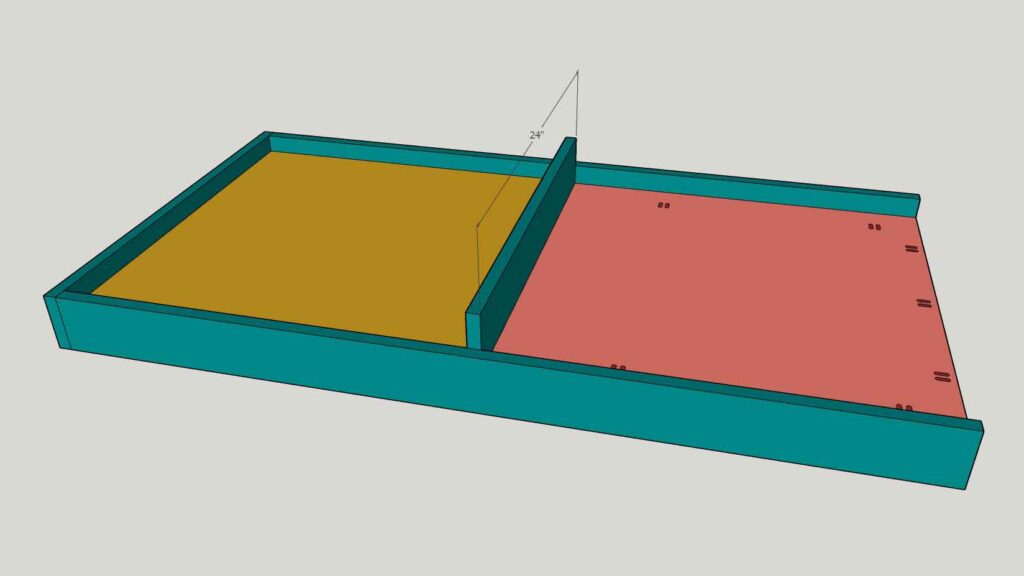
Without A Dado – While the whiteboard/blackboard is drying, cut a pair of 1×4’s down to 24″ for the marker/chalk shelf. Using wood glue and clamps, attach the shelf flush with the whiteboard/chalkboard on both sides and allow to dry.
Step 4 – Divider Base
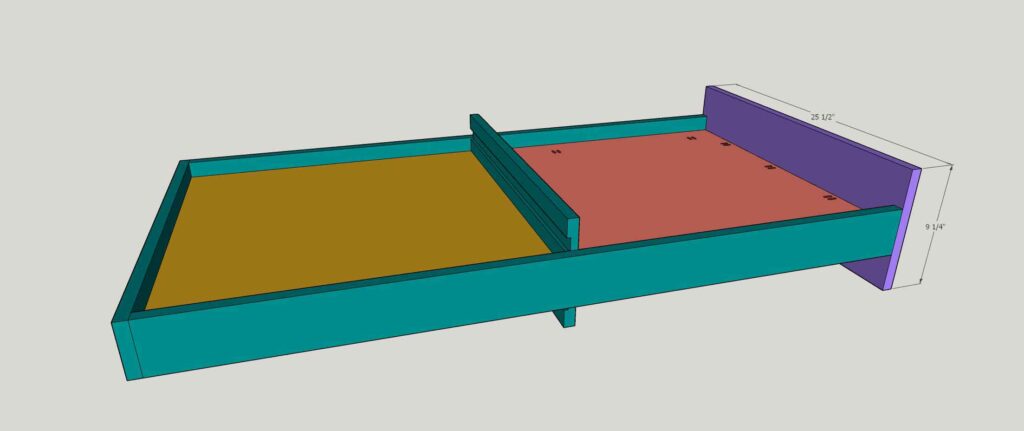
Without A Dado – Cut a piece of 1×10 down to 25-1/2″. Centered on the divider, attach with wood glue and the pre-drilled pocket holes with 1″ self tapping screws. You’ll notice the bottom panels still have not been attached yet. That’s so you have access to the pocket holes.
Step 5 – Bottom Paneling
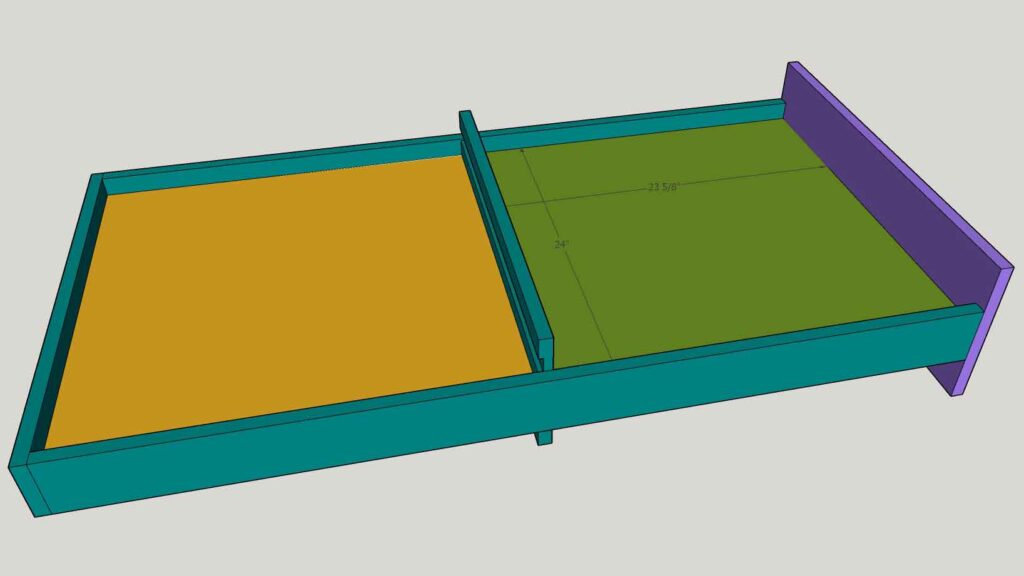
Without A Dado – With the frame, base and shelves dry, rip your sheet of underlayment wood paneling down to 24″ x 23-5/8″. Using the DAP Weldwood Contact Cement spray, attach to the divider in the bottom section covering the pocket holes. At this point the project steps will merge with the steps where the dados were used, so scroll down for the final steps!
Step 1 Frame & Base (Dado)
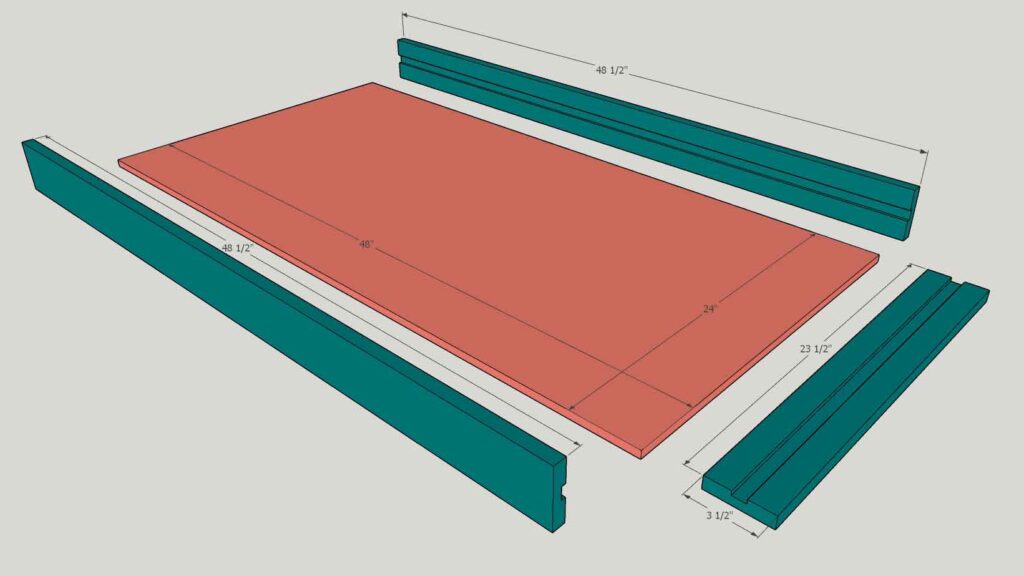
With A Dado – Instead of using pocket holes to connect the frame to the sheet of plywood we’ll be using a dado stack the table saw set to 3/4″ and ripping a groove for the sheet goods to slide into. First, confirm the 1/2″ sheet of plywood is 24″ x 48″ then cut a pair of 1×4’s to 48-1/2″ and then another piece to 23-1/2″. With the dado blade set to a depth of 1/4″ cut a centered groove centered down the middle of all three pieces of 1×4. Note* the dado is set to 3/4″ as the sheet of plywood and two wood panels were approximately 3/4″ thick when stacked. You might need to adjust your dado stack slightly wider to accommodate the stacked thickness of the sheet goods. Do not attach yet.
Step 2 – Frame & Divider Assembly (Dado)
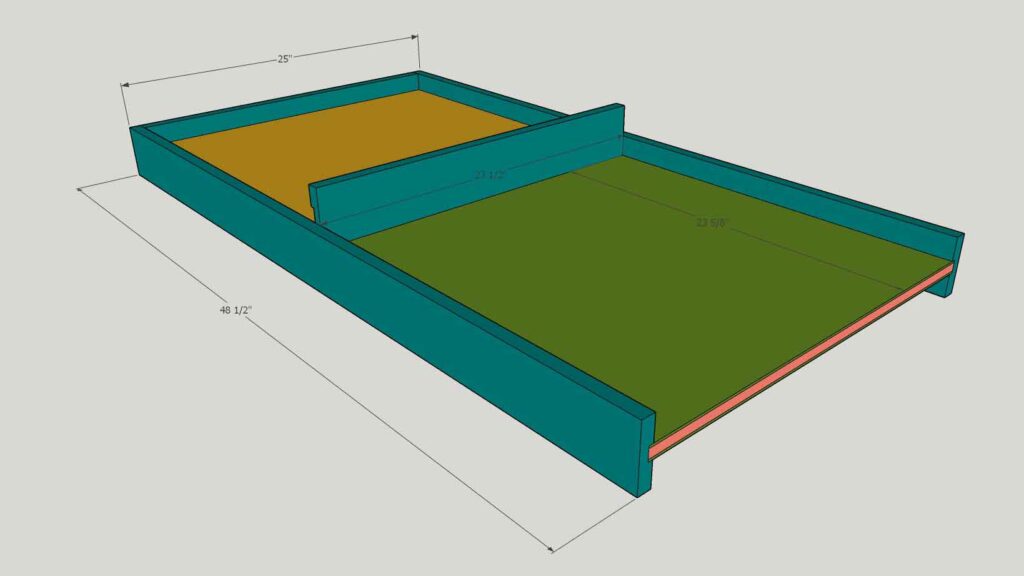
With A Dado – Rip your whiteboard/blackboard sheets down to 24″ x 23-5/8″. Using DAP Weldwood Contact Cement Spray attach the whiteboard/blackboard to the top of the 1/2″ plywood sheet. For the shelf divider cut a pair of 23-1/2″ pieces of 1×4 and then use as a spacer (do not attach yet) for the bottom panel. Rip the underlayment wood paneling down to 24″ x 23-5/8’s and attach to the rolling divider using the DAP Weldwood contact cement spray with the shelf divider in place as a spacer.
With all four panels dry on the sheet of plywood, use wood glue in the dado groove, then slide the stacked panels into the frame and assemble the top and sides. I did use a brad gun to take my frame into place while the glue dried. Then using wood glue and clamps, attach the 23-1/2″ shelf on both sides.
Step 3 – Divider Base (Dado)
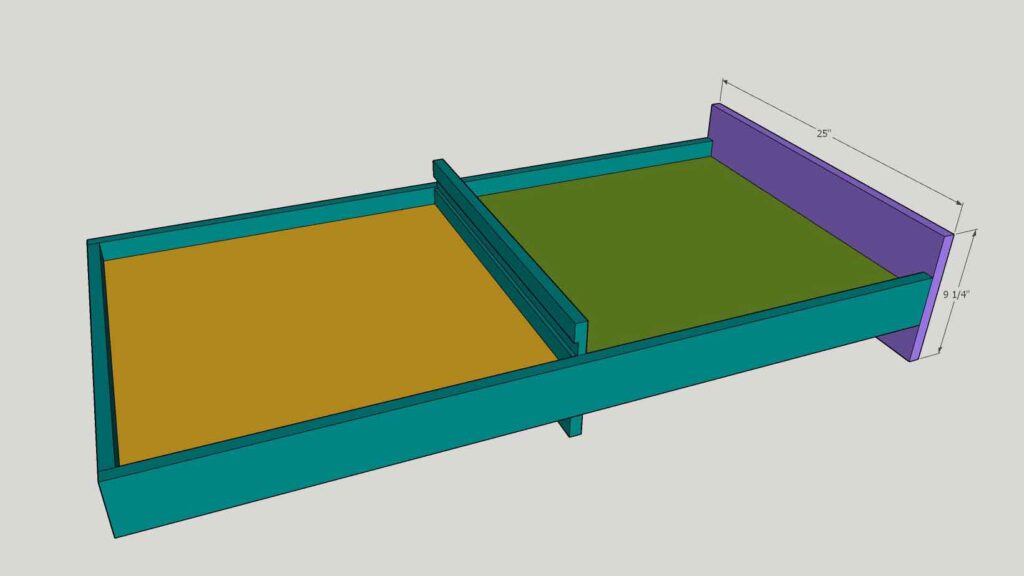
With A Dado – Cut a piece of 1×10 to 25″. For my build, I attached the base using a dowel jig and wood glue. But you can just easily attach the base using wood glue and a brad nailer from the bottom.
Base Supports (With & Without Dado)
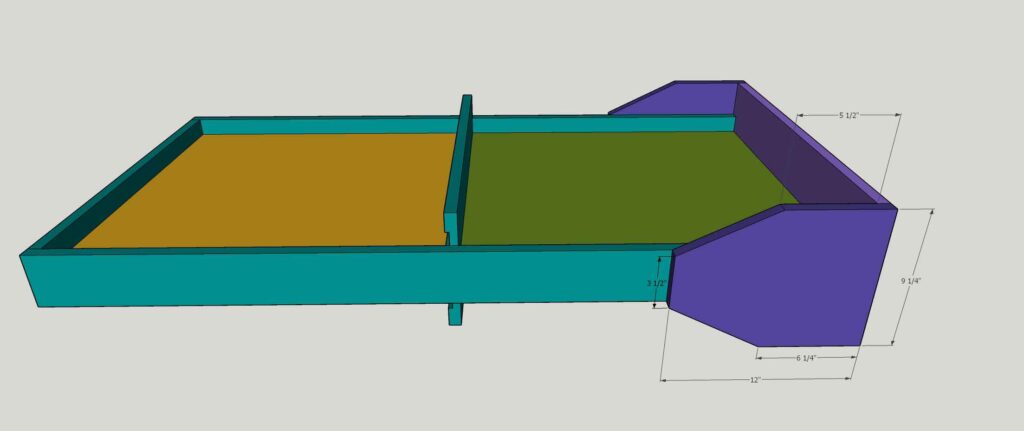
With And Without A Dado – Cut two pieces of 1×10 to 12″ long. Then using a table saw or miter saw, taper the top edges leaving a 6-1/4″ length on the sides. Attach to the frame using wood glue and then either pocket holes or a brad nailer.
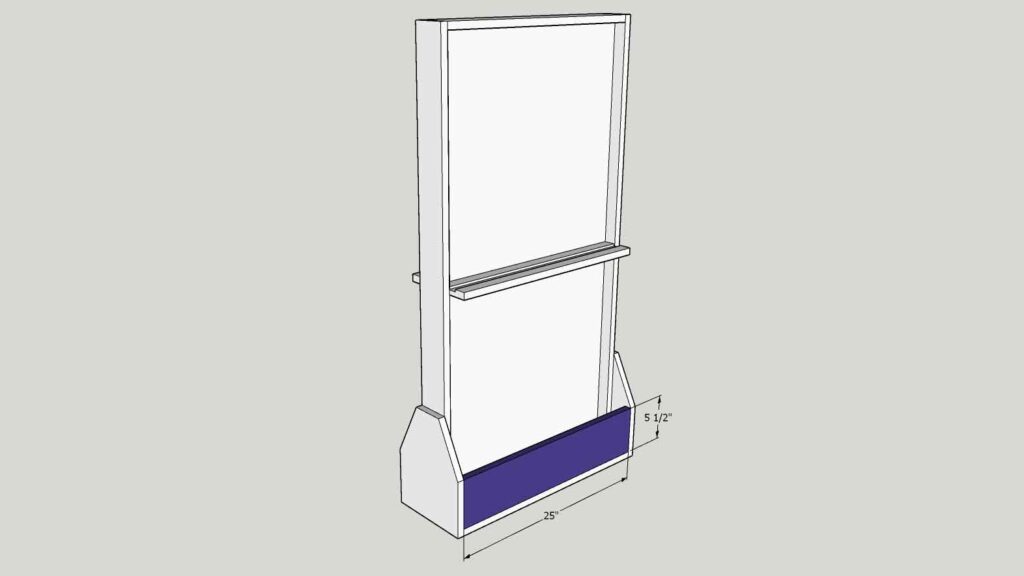
Cut a pair of 1×6’s down to 25″ (if you used the dado tract) or 25-1/2″ (if you used pocket holes). Use wood glue and then either pocket holes or brad nails to attach the front of the storage bin on both sides.
Finishing The Build
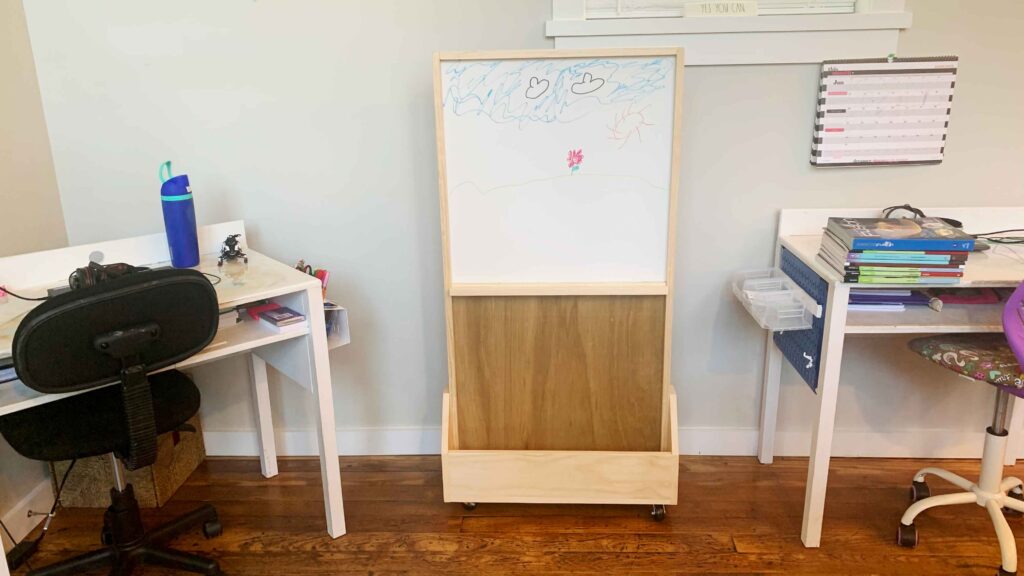
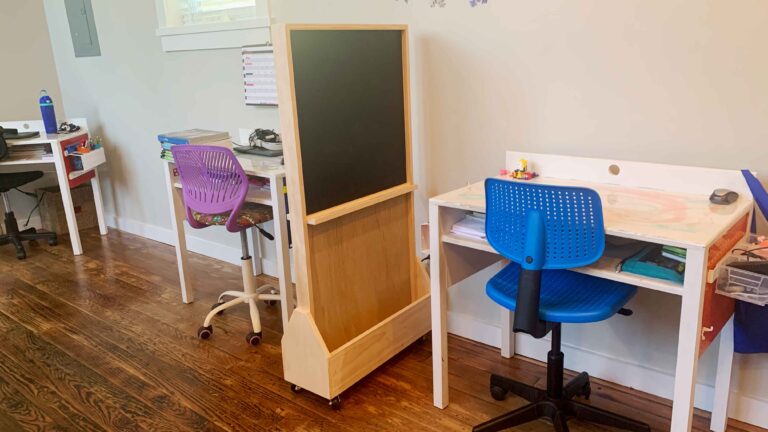
With everything dried and assembled, make sure you sand all the edges. I originally was going to paint the entire thing white, but actually really enjoyed the natural wood look. As far as the casters on the bottom, I used four and attached them to the base with 3/4″ pan-head screws. The great thing about this build is that it can be used as an educational build using the whiteboard/blackboard for school work, a divider and then also a back drop for those online classes! That’s a win/win/win.
~Lazy Guy
Like the pod desks? Check out the full Under $60 Virtual Learning Desk build plans!
*This post has been sponsored by DAP Products. I was provided with product and compensated for my time. My opinion on these products is my own.




Juul pods
How To Build A Rolling Classroom Divider – Lazy Guy DIY
product/poodle-puppies-near-me
How To Build A Rolling Classroom Divider – Lazy Guy DIY
32 20 wcf ammo
How To Build A Rolling Classroom Divider – Lazy Guy DIY
45 70 brass
How To Build A Rolling Classroom Divider – Lazy Guy DIY
Hk sp5
How To Build A Rolling Classroom Divider – Lazy Guy DIY
Rl26 powder
How To Build A Rolling Classroom Divider – Lazy Guy DIY
raw thc liquid
How To Build A Rolling Classroom Divider – Lazy Guy DIY
big chief carts
How To Build A Rolling Classroom Divider – Lazy Guy DIY
codeine linctus
How To Build A Rolling Classroom Divider – Lazy Guy DIY
Buy Medical Marijuana Online
How To Build A Rolling Classroom Divider – Lazy Guy DIY
Gravity Knife For Sale
How To Build A Rolling Classroom Divider – Lazy Guy DIY
FRT Trigger
How To Build A Rolling Classroom Divider – Lazy Guy DIY